Authentic Small Group Discussions with the Real Talk Strategy
What is the Real Talk Strategy?
Real Talk is a method in which students create their own talking points, write them onto sticky notes, and use what we call a Discussion Board as they have their conversation. They are encouraged not to rush through the conversation and to really dig into their ideas.
Why Use Real Talk?
I’m willing to bet you’ve experienced one or both of these two frustrations when orchestrating small group discussions in your classroom:
1. The Free-for-All Discussion. I fell into this trap in my early years of teaching, imagining that if I gave students a shared text and asked them to talk about some questions in small groups, they would dig deep and have fruitful conversations. Nope. Here is what I got from these talks:
- Some students would contribute, and some wouldn’t.
- Most groups just rushed through the questions with surface-level responses.
- Groups would finish at different rates, and the groups that felt they were done discussing would become hard to manage.
- Students rarely seemed to connect with the text or care about the conversation. There was little to no investment in, or ownership of, the discussion.
Cannata, Jessica. "Get Real with Small Group Discussions" EB Academics 11, Oct. 2021, https://ebacademics.com/ 2021/10/critical-thinking-resource.html
2. The Micromanaged Discussion. When the “Free-for-All” didn’t work, I pivoted in the other direction. Like many teachers, I turned to lit circle roles (Discussion Director, Symbol Sleuth, Quote Captain, etc.) to help make students more accountable for contributing and to guide their talks a little more. Now, some teachers love lit circle roles, and if they work for your students, I’m not certainly not going to advise you to stop using them. But this was my experience in assigning roles before discussions:
- The discussions didn’t sound natural; students just took turns reading out their notes.
- Students became so invested in their individual roles that they failed to make connections between ideas or see the “big picture” of the conversation.
- Many of the students didn’t like their roles and lacked interest in the conversation.
- Many students felt stifled by the strict structure of the roles and felt like their conversation didn’t go in a productive direction.
Again, I’m not hating on either of the above strategies if they’re working in your classroom and producing meaningful, engaging conversations among all of your students. But if you’re like me and you need a different method for helping students to take ownership of their conversations while still feeling structured and supported (or if your current discussions are going great but you’re looking for something new to try), then keep reading for a third option that you’ll likely find to be a real game changer!
How to Use Real Talk
1. Have students create Talking Points based on a text they have just read. We call them “Talking Points” and not “discussion questions” because we’ve found in our experience that students often don’t need questions to have a great discussion! Instead, students receive a handout with the following types of Talking Points they can create:
- Discussion Questions (classic, open-ended questions about the text)
- Quotes (quotes from the text that students find thought-provoking or significant)
- Observations (insightful observations students made while reading the text)
- Style (interesting details students noticed about the style of the text)
- Vocabulary (word choice that students found to be important in the text, or unknown vocab they would like to discuss)
- Connections (connections students made with the text as they read)
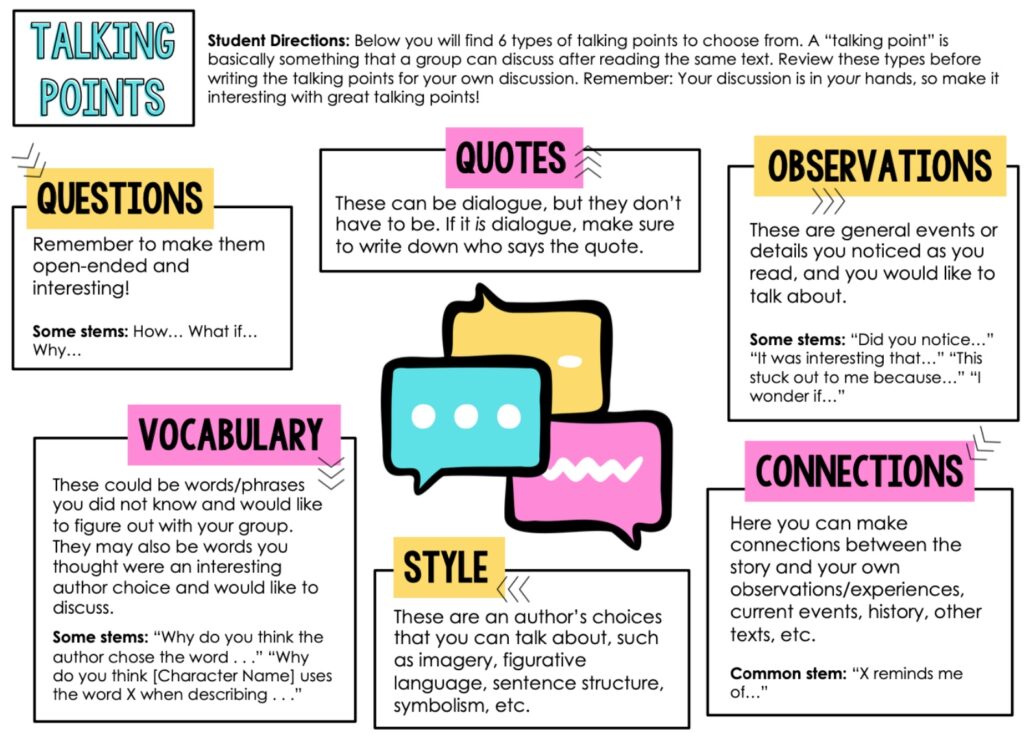
Students receive a graphic organizer to write down six Talking Points. We want this discussion to be natural, so they do not have to use each type of Talking Point! For example, a student might write down two quotes, two vocabulary words, one observation, and one connection. It’s up to the student.
2. Instruct students to transfer the Talking Points to sticky notes. Next, students choose their four favorite Talking Points and transfer them to sticky notes. Why four? This way, each student has two Talking Points left in case the group finishes discussing early. They can then pull these “extras” out to keep the talk going. No more early finishing groups!
3. Have students organize their Talking Points in their small groups. Before discussing, each student will read their sticky notes out loud to the group. The group will then place any “repeat” notes (Talking Points that are very similar) together, so they aren’t discussed twice. They will also stack their notes in the order in which they want to discuss them.
4. Tell students to start talking, using their sticky notes and Discussion Board. Our Discussion Board is essentially a piece of paper with three spots: an area to the side for the sticky notes that will be discussed, an area in the center for the sticky note that is “Under Discussion,” and an area on the other side for students to place their most interesting Talking Point (more on that next).
5. Remind students, “Discuss, don’t rush!” This part is so important that our resource even includes a poster to remind students! Let students know that they do not have to finish all their sticky notes! That’s right — if students get so invested talking about some of their Talking Points that they don’t get to others, that is totally okay. It’s also okay for students to veer off the topic of the sticky note under discussion, as long as their conversation still connects to the text or its ideas. How freeing for students to know that they can talk without pressure to finish, and that they can linger on ideas that interest them most! This is why we call it “Real Talk” — students engage in natural conversations, the kinds people have outside of school and in the adult world.
6. Wrap up with a whole-class discussion. In the last two minutes, instruct groups to choose the sticky note they discussed for the longest period of time and place it on that area of their Discussion Board. Next, have each group share this sticky note with the class and let the whole class join in and talk about it. It’s guaranteed to be a fascinating conversation!
Real Talk FAQ
1. If students don’t have roles, how can I hold them accountable for contributing?
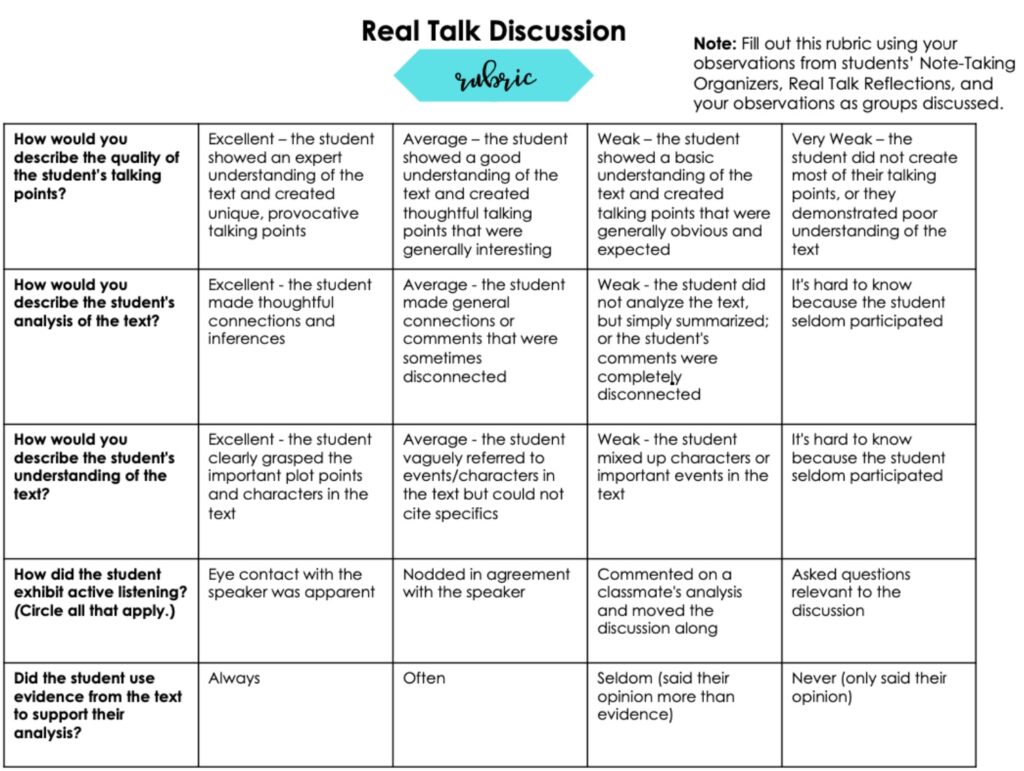
There are a few ways! The first is to collect the graphic organizer on which students wrote their Talking Points, so you can assess individuals’ notes. You can also have students write their initials on their sticky notes, so you can read them straight from the Discussion Board when you collect it. Finally, our resource includes a rubric and a student reflection to help with assessment.
2. I like that the students write their own Talking Points, but what if groups miss important discussion topics during their talks?
There are two ways to address this. First, you could require that one or two specific Talking Points be included in the discussion. You could also use the whole-class discussion at the end to bring up topics that you thought were glossed over during the talks.
3. With all the groups talking at once, how do I know how each group’s discussion went?
That’s the beauty of this activity! There are so many ways to informally and formally observe groups’ discussions.
- You probably do this already, but circulate among groups as they talk. Our resource provides a simple rubric that you can fill out as you do this.
- Collect the Discussion Boards and look through them. The boards will show you which Talking Points students discussed, which they didn’t get to, and what their most interesting point was.
- Have students write a reflection (like the one provided in our resource) on their contribution to the discussion and the discussion’s successes and challenges. We also recommend that students choose one Talking Point to respond to in writing, so you can see how each student responds to the text.